How To Make A Simple Charcuterie Board!
- Lifestyle
- August 1, 2023

Now that summer is here and entertaining is kicking into full gear, having some go-to appetizers is a big-time saver. A summer cheese board or charcuterie board is the answer! Whether you are entertaining at home or invited out, a cheese board or charcuterie board is a wonderful way to offer something that has selections for everyone. It’s easy to put together, easy to transport- add some garnishes for some bright colors and you are ready to go. Side note- bring a few packages of cute cocktail napkins for your hostess as your hostess gift.
A charcuterie board is an appetizer served on a wooden board, large platter or a large handled basket or even a tray. Typically, they include meats, cheeses, starches and other accompaniments. In recent years, we have seen how boards are a great way to entertain and can be tailored to each season and to your guests tastes. There are many ideas out there- even meal boards. Also, they are a wonderfully creative way to add an interesting centerpiece to your tablescape for any gathering. They are perfect for a larger crowd as well and are a great ice breaker for your guests.
How To Make a Simple Charcuterie Board
FIrst….get organized! You will need to figure out what board, basket or tray you will want to assemble your charcuterie board on! There are so many options available! Small boards for small gatherings or absolutely gigantic boards and trays that can feed a large party are all to be considered.
Charcuterie Board Accessories
Assemble all the additional accessories you need to pull the board together. This list of items may include but not limited to ramekins, small bowls, cheese forks and knives, cheese papers or doilies, and picks. The ramekins would be perfect for displaying mustards, jams, or nuts on your cheese board. Check out some of our favorites cheese board accessories below…..just click on the link for additional information on the product.
One of the best tools we have found to build a beautiful charcuterie board is a crinkle cutting tool. The cheese you put on your boards then have a pretty wavy edge which amps up the look of the board. This tool is so easy to use! Take a look here to see this amazing tool!
What Are Good Cheeses For A Charcuterie Board
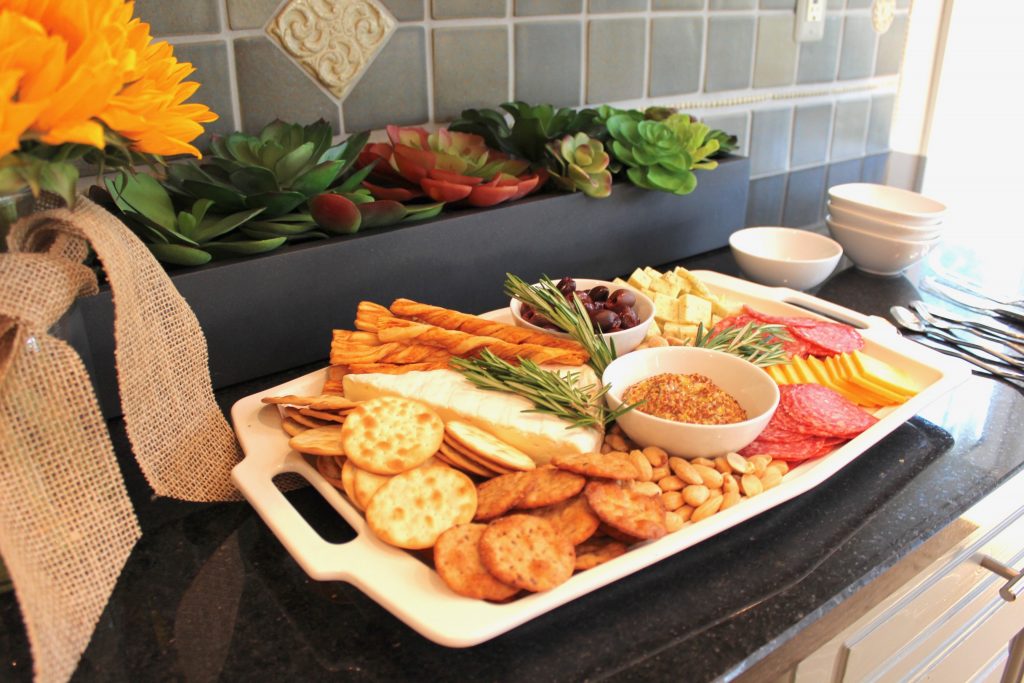
We love cheese….really love cheese! The types of cheeses you can choose for your board are endless but it is usually a good idea to follow the 3 – 3 – 3 – 3 rule. What does that mean? Three meats, three cheese, three starches and three accompaniments. When selecting the cheese we like to utilize a white cheese, a yellow cheese and maybe a unique cheese that no one has tried! In truth you should always select the cheese that you enjoy the most. Some of our favorite cheeses are gouda, white cheddar, brie, parmesan, asiago, havarti, muenster, boursin, burrata, goat cheese and blue cheeses. They all have varying colors and textures which will make your board more interesting. Side note – buy fig preserves and coat the top of the brie…it is deee-licious!!!
Assemble Your Cheese Tray
Keep this simple — anything that needs to go in a ramekin or bowl like jams, nuts, dips or mustard should all be filled first so you can then position them at strategic points on your board. For example, the mustards should be in close proximity to the meats.
Offering three cheeses is a great start. Serve cheeses at room temperature and consider slicing harder cheeses before. Who likes wrestling with that cheese knife anyway? You do not have to slice all of your cheeses….you can put a chunk of your favorite cheese on the board so your guests can slide their own piece! Plus,,, it really looks good on the board too! Place cheeses starting in the middle and fanout toward the edges.
Place the meats alongside the cheeses. Add any dips or mustards that you want to serve with them. Make sure you include appetizer knives and forks in areas around the meats and mustards for spreading purposes.
Add the crackers on various areas of the tray filling those empty spaces.
Add the remaining accompaniments to add interest to your board. Accompaniments are items such as fruits, dried fruits, or nuts!
How To Keep A Cheese Board Fresh
You can create your cheese board a day ahead as long as you keep the crunchy items like nuts and crackers off since they will get soggy. You can fill your ramekins or bowls with the dips and mustards and cover them with Saran Wrap.
Cover the cheese board after it is made in parchment or wax paper then wrap it all over with aluminum foil. This will protect the cheese board. Keep it in a cool environment like your refrigerator …… making sure you have it wrapped as described above very tightly to avoid it from drying out.
Don’t serve the cheese board too soon… a half hour before guests arrive is a good idea so the cheese will come to room temperature and will be easier to cut. Add the crackers at the last minute so they stay nice and crunchy.
Make it a point to put the charcuterie board away when cocktail hour is over and you are preparing to serve your main meal.
Summer is such a fun season to entertain outside and charcuterie and cheese boards are the way to go. There are no rules! Have fun putting it together and get adventuresome in selecting the cheeses and accompaniments. Decorating your boards for the current season or holiday is something to consider. Putting flowers on a summer board or little pumpkins on the board in the fall are examples of this!
Please share any ideas you may have with us since we always love a new idea when creating these boards!
Happy Summer Everyone!
Bev & Val xo
In the spirit of full disclosure, this site contains affiliate links, which means that we may get a commission if you decide to purchase anything from suggested companies. We only recommend products and companies that we use and love.


